Activity 启动流程分析

从一个 Activity 启动另一个 Activity 会有哪些生命周期的回调?比如 Activity A 通过 startActivity() 启动 Activity B,默认启动模式下它们的生命周期回调是这样的:

1
2
3
4
5
Activity A:onPaused
Activity B:onCreate
Activity B:onStart
Activity B:onResume
Activity A:onStop

所以接下来就开始分析从调用 startActivity() 开始都经过了哪些类哪些方法。本篇不会很详细地分析启动流程的各个方法,只会让你对整个流程有个理性的认识。

温馨提示:强烈推荐跟着文章一边看源码一边画流程,否则后果自负。

1 请求启动

1.1 启动过程

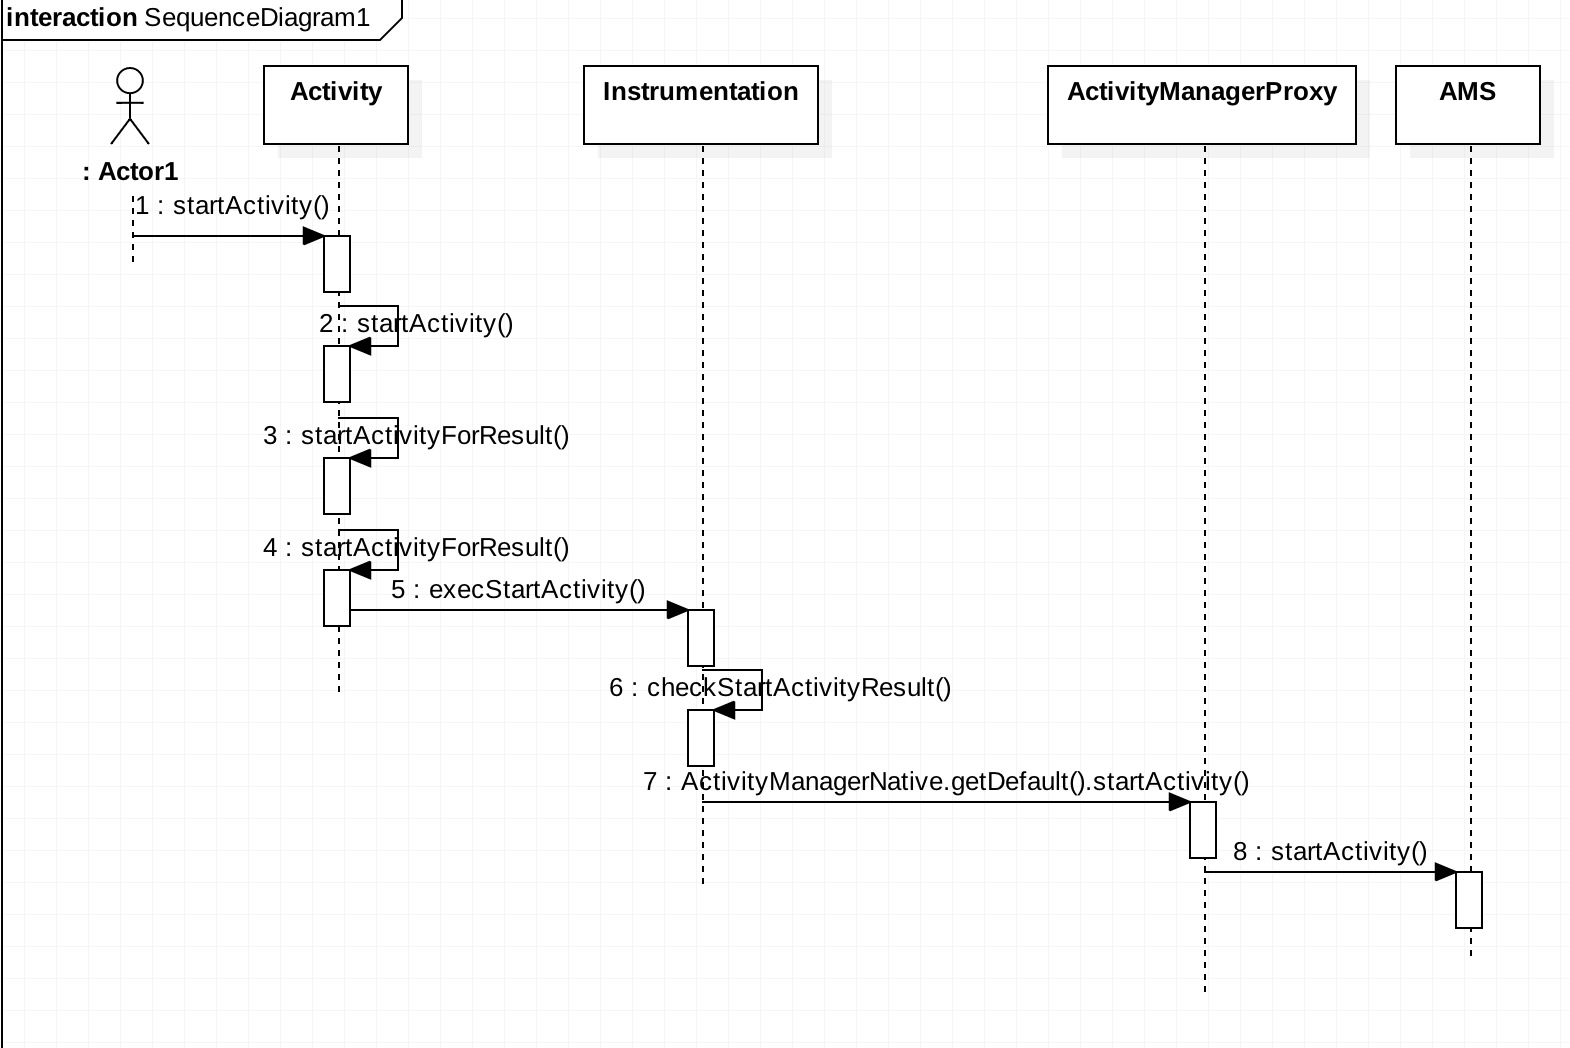
首先看看调用 startActivity() 时都会执行哪些方法:

1
2
3
4
5
6
7
8
9
10
11
12
13
14
15
16
17
18
19
20
21
22
23
24
25
26
27
28
29
30
31
32
33
34
35
36
37
38
39
@Override
public void startActivity(Intent intent) {
this.startActivity(intent, null);
}

@Override
public void startActivity(Intent intent, @Nullable Bundle options) {
if (options != null) {
startActivityForResult(intent, -1, options);
} else {
startActivityForResult(intent, -1);
}
}

public void startActivityForResult(Intent intent, int requestCode) {
startActivityForResult(intent, requestCode, null);
}

public void startActivityForResult(Intent intent, int requestCode, @Nullable Bundle options) {
if (mParent == null) {
Instrumentation.ActivityResult ar = mInstrumentation.execStartActivity(
this, mMainThread.getApplicationThread(), mToken, this,
intent, requestCode, options);
if (ar != null) {
mMainThread.sendActivityResult(mToken, mEmbeddedID, requestCode,
ar.getResultCode(), ar.getResultData());
}
if (requestCode >= 0) {
mStartedActivity = true;
}
cancelInputsAndStartExitTransition(options);
} else {
if (options != null) {
mParent.startActivityFromChild(this, intent, requestCode, options);
} else {
mParent.startActivityFromChild(this, intent, requestCode);
}
}
}

很明显,当调用 startActivity() 时内部调用的是 startActivityForResult(),并且传递的 requestCode 为 -1。所以如果是通过 startActivityForResult() 启动另一个 Activity 时 requestCode 必须大于等于 0,否则是不会回调 onActivityResult() 的。

在上面最后一个 startActivityForResult() 中只需关注 mParent == null 的情况。

在第 21 行调用了Instrumentation 的 execStartActivity() 方法,这个 Instrumentation 是什么鬼?其实 Instrumentation 是 Android 系统中启动 Activity 的实际操作类。

execStartActivity() 方法有个参数需要注意下:mMainThread.getApplicationThread(),这里是拿到 ActivityThread 类的内部类 ApplicationThread 的对象,并且 ApplicationThread 继承自 ApplicationThreadNative:

1
2
3
4
5
6
7
8
9
10
11
public final class ActivityThread {
...
private class ApplicationThread extends ApplicationThreadNative {
...
public ApplicationThread getApplicationThread() {
return mAppThread;
}
...
}
...
}

往下看 execStartActivity():

1
2
3
4
5
6
7
8
9
10
11
12
13
14
15
16
17
18
19
public ActivityResult execStartActivity(
Context who, IBinder contextThread, IBinder token, Activity target,
Intent intent, int requestCode, Bundle options) {
IApplicationThread whoThread = (IApplicationThread) contextThread;
...
try {
intent.migrateExtraStreamToClipData();
intent.prepareToLeaveProcess();
int result = ActivityManagerNative.getDefault()
.startActivity(whoThread, who.getBasePackageName(), intent,
intent.resolveTypeIfNeeded(who.getContentResolver()),
token, target != null ? target.mEmbeddedID : null,
requestCode, 0, null, options);
checkStartActivityResult(result, intent);
} catch (RemoteException e) {
throw new RuntimeException("Failure from system", e);
}
return null;
}

先看看第14行的 checkStartActivityResult() 方法实现:

1
2
3
4
5
6
7
8
9
10
11
12
13
14
15
16
17
18
19
20
21
22
23
24
25
26
27
28
29
30
31
32
33
34
35
36
37
public static void checkStartActivityResult(int res, Object intent) {
if (res >= ActivityManager.START_SUCCESS) {
return;
}

switch (res) {
case ActivityManager.START_INTENT_NOT_RESOLVED:
case ActivityManager.START_CLASS_NOT_FOUND:
if (intent instanceof Intent && ((Intent)intent).getComponent() != null)
throw new ActivityNotFoundException(
"Unable to find explicit activity class "
+ ((Intent)intent).getComponent().toShortString()
+ "; have you declared this activity in your AndroidManifest.xml?");
throw new ActivityNotFoundException(
"No Activity found to handle " + intent);
case ActivityManager.START_PERMISSION_DENIED:
throw new SecurityException("Not allowed to start activity "
+ intent);
case ActivityManager.START_FORWARD_AND_REQUEST_CONFLICT:
throw new AndroidRuntimeException(
"FORWARD_RESULT_FLAG used while also requesting a result");
case ActivityManager.START_NOT_ACTIVITY:
throw new IllegalArgumentException(
"PendingIntent is not an activity");
case ActivityManager.START_NOT_VOICE_COMPATIBLE:
throw new SecurityException(
"Starting under voice control not allowed for: " + intent);
case ActivityManager.START_NOT_CURRENT_USER_ACTIVITY:
Log.e(TAG,
"Not allowed to start background user activity that shouldn't be displayed"
+ " for all users. Failing silently...");
break;
default:
throw new AndroidRuntimeException("Unknown error code "
+ res + " when starting " + intent);
}
}

嗯,就是检查启动 Activity 的结果,最熟悉的应该就是那个“Unable to find explicit activity class XXX; have you declared this activity in your AndroidManifest.xml?”

所以在 checkStartActivityResult() 前面的那句 ActivityManagerNative.getDefault().startActivity() 主要就是用来启动 Activity 的,这个 ActivityManagerNative 又是个什么鬼?先看看 getDefault():

1
2
3
4
5
6
7
8
9
10
11
12
13
14
15
16
17
18
19
20
21
22
23
24
25
26
27
28
29
30
31
32
33
34
35
36
37
38
39
40
41
42
static public IActivityManager getDefault() {
return gDefault.get();
}

private static final Singleton<IActivityManager> gDefault = new Singleton<IActivityManager>() {
protected IActivityManager create() {
IBinder b = ServiceManager.getService("activity");
if (false) {
Log.v("ActivityManager", "default service binder = " + b);
}
IActivityManager am = asInterface(b);
if (false) {
Log.v("ActivityManager", "default service = " + am);
}
return am;
}
};

public abstract class Singleton<T> {
private T mInstance;
protected abstract T create();
public final T get() {
synchronized (this) {
if (mInstance == null) {
mInstance = create();
}
return mInstance;
}
}
}

static public IActivityManager asInterface(IBinder obj) {
if (obj == null) {
return null;
}
IActivityManager in =
(IActivityManager)obj.queryLocalInterface(descriptor);
if (in != null) {
return in;
}
return new ActivityManagerProxy(obj);
}

所以 getDefault() 就是拿到 IActivityManager 的单例对象,即通过 asInterface() 返回的 ActivityManagerProxy 对象。看到这里有发现什么东西么?没有?Binder ?那就再看看 ActivityManagerProxy 的 startActivity():

1
2
3
4
5
6
7
8
9
10
11
12
13
14
15
16
17
18
19
20
21
22
23
24
25
26
27
28
29
30
31
32
33
public int startActivity(IApplicationThread caller, String callingPackage, Intent intent,
String resolvedType, IBinder resultTo, String resultWho, int requestCode,
int startFlags, ProfilerInfo profilerInfo, Bundle options) throws RemoteException {
Parcel data = Parcel.obtain();
Parcel reply = Parcel.obtain();
data.writeInterfaceToken(IActivityManager.descriptor);
data.writeStrongBinder(caller != null ? caller.asBinder() : null);
data.writeString(callingPackage);
intent.writeToParcel(data, 0);
data.writeString(resolvedType);
data.writeStrongBinder(resultTo);
data.writeString(resultWho);
data.writeInt(requestCode);
data.writeInt(startFlags);
if (profilerInfo != null) {
data.writeInt(1);
profilerInfo.writeToParcel(data, Parcelable.PARCELABLE_WRITE_RETURN_VALUE);
} else {
data.writeInt(0);
}
if (options != null) {
data.writeInt(1);
options.writeToParcel(data, 0);
} else {
data.writeInt(0);
}
mRemote.transact(START_ACTIVITY_TRANSACTION, data, reply, 0);
reply.readException();
int result = reply.readInt();
reply.recycle();
data.recycle();
return result;
}

看第 27 行 mRemote.transact() 是不是一切明朗了?还是不懂?那就简单说一下:应用进程与系统进程是两个不同的进程,它们之间需要通过跨进程来通信,类似于客户端与服务端。客户端通过 transact() 方法来发起 RPC(远程过程调用)请求,这个请求被系统底层封装后交给服务端,然后服务端的 onTransact() 方法就会被调用。

ActivityManagerProxy 是 ActivityManagerNative 的内部类,都实现了 IActivityManager 接口,在这里它们都是客户端,服务端就是 ActivityManagerService 即传说中的 AMS。

1.2 小结:

  • 通过 startActivity() 或 startActivityForResult() 启动 Activity 最后都是调用了 startActivityForResult(),区别就是 startActivity() 传递的 requestCode = -1;
  • 启动 Activity 最终都会交给 Instrumentation 来处理,然后再由 ActivityManagerProxy 通过 Binder 的进程间通信交给 ActivityManagerService 来处理。

2 onPause() 的回调

2.1 AMS 接收启动请求

根据上面的分析,此时应该进入到 ActivityManagerService 的 onTransact() 方法,并且 code 是 START_ACTIVITY_TRANSACTION

1
2
3
4
5
6
7
8
9
10
@Override
public boolean onTransact(int code, Parcel data, Parcel reply, int flags)
throws RemoteException {
...
try {
return super.onTransact(code, data, reply, flags);
} catch (RuntimeException e) {
...
}
}

在第 6 行直接调用了父类的 onTransact() 来处理,它的父类又是谁呢?

1
2
3
4
public final class ActivityManagerService extends ActivityManagerNative
implements Watchdog.Monitor, BatteryStatsImpl.BatteryCallback {
...
}

有木有感觉被套路了一波?从 ActivityManagerNative 跨进程发送消息到 ActivityManagerService,结果又回到了 ActivityManagerNative。所以还是回到 ActivityManagerNative 的 onTransact,并且 code 是 START_ACTIVITY_TRANSACTION

1
2
3
4
5
6
7
8
9
10
11
12
13
14
15
16
17
18
19
20
21
22
23
24
25
26
27
@Override
public boolean onTransact(int code, Parcel data, Parcel reply, int flags)
throws RemoteException {
switch (code) {
case START_ACTIVITY_TRANSACTION: {
data.enforceInterface(IActivityManager.descriptor);
IBinder b = data.readStrongBinder();
IApplicationThread app = ApplicationThreadNative.asInterface(b);
String callingPackage = data.readString();
Intent intent = Intent.CREATOR.createFromParcel(data);
String resolvedType = data.readString();
IBinder resultTo = data.readStrongBinder();
String resultWho = data.readString();
int requestCode = data.readInt();
int startFlags = data.readInt();
ProfilerInfo profilerInfo = data.readInt() != 0
? ProfilerInfo.CREATOR.createFromParcel(data) : null;
Bundle options = data.readInt() != 0
? Bundle.CREATOR.createFromParcel(data) : null;
int result = startActivity(app, callingPackage, intent, resolvedType,
resultTo, resultWho, requestCode, startFlags, profilerInfo, options);
reply.writeNoException();
reply.writeInt(result);
return true;
}
...
}

第20行,终于到了 ActivityManagerService 的 startActivity():

1
2
3
4
5
6
7
8
9
10
11
12
13
14
15
16
17
18
19
@Override
public final int startActivity(IApplicationThread caller, String callingPackage,
Intent intent, String resolvedType, IBinder resultTo, String resultWho,
int requestCode, int startFlags, ProfilerInfo profilerInfo, Bundle bOptions) {
return startActivityAsUser(caller, callingPackage, intent, resolvedType, resultTo,
resultWho, requestCode, startFlags, profilerInfo, bOptions,
UserHandle.getCallingUserId());
}

@Override
public final int startActivityAsUser(IApplicationThread caller, String callingPackage,
Intent intent, String resolvedType, IBinder resultTo, String resultWho, int requestCode,
int startFlags, ProfilerInfo profilerInfo, Bundle bOptions, int userId) {
enforceNotIsolatedCaller("startActivity");
userId = mUserController.handleIncomingUser(Binder.getCallingPid(), Binder.getCallingUid(), userId, false, ALLOW_FULL_ONLY, "startActivity", null);
return mActivityStarter.startActivityMayWait(caller, -1, callingPackage, intent,
resolvedType, null, null, resultTo, resultWho, requestCode, startFlags,
profilerInfo, null, null, bOptions, false, userId, null, null);
}

ActivityManagerService 的 startActivityAsUser() 方法又调用了 ActivityStarter 的 startActivityMayWait() 方法,所以看看 startActivityMayWait() :

1
2
3
4
5
6
7
8
9
10
11
12
13
14
15
16
17
18
19
20
21
22
23
24
25
26
27
28
29
30
31
32
33
34
35
36
37
38
39
40
41
42
43
44
45
46
47
48
49
50
51
52
53
54
55
56
57
58
59
60
61
62
63
64
65
final int startActivityMayWait(IApplicationThread caller, int callingUid,
String callingPackage, Intent intent, String resolvedType,
IVoiceInteractionSession voiceSession, IVoiceInteractor voiceInteractor,
IBinder resultTo, String resultWho, int requestCode, int startFlags,
ProfilerInfo profilerInfo, IActivityManager.WaitResult outResult, Configuration config,
Bundle bOptions, boolean ignoreTargetSecurity, int userId,
IActivityContainer iContainer, TaskRecord inTask) {
...
final ActivityRecord[] outRecord = new ActivityRecord[1];
// 这里是关键代码
int res = startActivityLocked(caller, intent, ephemeralIntent, resolvedType,
aInfo, rInfo, voiceSession, voiceInteractor,
resultTo, resultWho, requestCode, callingPid,
callingUid, callingPackage, realCallingPid, realCallingUid, startFlags,
options, ignoreTargetSecurity, componentSpecified, outRecord, container,
inTask);

Binder.restoreCallingIdentity(origId);
...
return res;
}
}

final int startActivityLocked(IApplicationThread caller, Intent intent, Intent ephemeralIntent,
String resolvedType, ActivityInfo aInfo, ResolveInfo rInfo,
IVoiceInteractionSession voiceSession, IVoiceInteractor voiceInteractor,
IBinder resultTo, String resultWho, int requestCode, int callingPid, int callingUid,
String callingPackage, int realCallingPid, int realCallingUid, int startFlags,
ActivityOptions options, boolean ignoreTargetSecurity, boolean componentSpecified,
ActivityRecord[] outActivity, ActivityStackSupervisor.ActivityContainer container,
TaskRecord inTask) {
...
try {
mService.mWindowManager.deferSurfaceLayout();
// 这里是关键代码
err = startActivityUnchecked(r, sourceRecord, voiceSession, voiceInteractor, startFlags,
true, options, inTask);
} finally {
mService.mWindowManager.continueSurfaceLayout();
}
postStartActivityUncheckedProcessing(r, err, stack.mStackId, mSourceRecord, mTargetStack);
return err;
}

private int startActivityUnchecked(final ActivityRecord r, ActivityRecord sourceRecord,
IVoiceInteractionSession voiceSession, IVoiceInteractor voiceInteractor,
int startFlags, boolean doResume, ActivityOptions options, TaskRecord inTask) {
if (mDoResume) {
...
if (!mTargetStack.isFocusable()
|| (topTaskActivity != null && topTaskActivity.mTaskOverlay
&& mStartActivity != topTaskActivity)) {
mTargetStack.ensureActivitiesVisibleLocked(null, 0, !PRESERVE_WINDOWS);
mWindowManager.executeAppTransition();
} else {
// 这里是关键代码
mSupervisor.resumeFocusedStackTopActivityLocked(mTargetStack, mStartActivity,
mOptions);
}
} else {
mTargetStack.addRecentActivityLocked(mStartActivity);
}
...
return START_SUCCESS;
}

上面第 11 行调用了 startActivityLocked() 方法,然后在第36行调用了 startActivityUnchecked(),接着在第57行调用了 ActivityStackSupervisor 的 resumeFocusedStackTopActivityLocked() 方法。所以接下来看看 resumeFocusedStackTopActivityLocked() 方法:

1
2
3
4
5
6
7
8
9
10
11
boolean resumeFocusedStackTopActivityLocked(
ActivityStack targetStack, ActivityRecord target, ActivityOptions targetOptions) {
if (targetStack != null && isFocusedStack(targetStack)) {
return targetStack.resumeTopActivityUncheckedLocked(target, targetOptions);
}
final ActivityRecord r = mFocusedStack.topRunningActivityLocked();
if (r == null || r.state != RESUMED) {
mFocusedStack.resumeTopActivityUncheckedLocked(null, null);
}
return false;
}

在第 4 行调用了 ActivityStack 的 resumeTopActivityUncheckedLocked():

1
2
3
4
5
6
7
8
9
10
11
12
13
14
15
16
17
18
19
20
21
22
23
24
25
26
27
28
29
30
31
32
33
34
35
36
37
38
39
40
41
42
43
44
45
46
47
48
49
boolean resumeTopActivityUncheckedLocked(ActivityRecord prev, ActivityOptions options) {
if (mStackSupervisor.inResumeTopActivity) {
return false;
}
boolean result = false;
try {
mStackSupervisor.inResumeTopActivity = true;
if (mService.mLockScreenShown == ActivityManagerService.LOCK_SCREEN_LEAVING) {
mService.mLockScreenShown = ActivityManagerService.LOCK_SCREEN_HIDDEN;
mService.updateSleepIfNeededLocked();
}
result = resumeTopActivityInnerLocked(prev, options);
} finally {
mStackSupervisor.inResumeTopActivity = false;
}
return result;
}

private boolean resumeTopActivityInnerLocked(ActivityRecord prev, ActivityOptions options) {
...
//当正处于暂停 Activity
if (!mStackSupervisor.allPausedActivitiesComplete()) {
if (DEBUG_SWITCH || DEBUG_PAUSE || DEBUG_STATES) Slog.v(TAG_PAUSE,
"resumeTopActivityLocked: Skip resume: some activity pausing.");
if (DEBUG_STACK) mStackSupervisor.validateTopActivitiesLocked();
return false;
}

mStackSupervisor.setLaunchSource(next.info.applicationInfo.uid);
// We need to start pausing the current activity so the top one can be resumed...
final boolean dontWaitForPause = (next.info.flags & FLAG_RESUME_WHILE_PAUSING) != 0;
boolean pausing = mStackSupervisor.pauseBackStacks(userLeaving, next, dontWaitForPause);
if (mResumedActivity != null) {
if (DEBUG_STATES) Slog.d(TAG_STATES,
"resumeTopActivityLocked: Pausing " + mResumedActivity);
pausing |= startPausingLocked(userLeaving, false, next, dontWaitForPause);
}
...
try {
...
} catch (Exception e) {
...
mStackSupervisor.startSpecificActivityLocked(next, true, false);
if (DEBUG_STACK) mStackSupervisor.validateTopActivitiesLocked();
return true;
}
...
return true;
}

第 22 行那里先进行判断该 Acitvity 是否正处于暂停。第 36 行和 43 行是两个比较重要的方法调用,先来看看 startPausingLocked():

2.2 栈顶 Activity 的 onPause()

1
2
3
4
5
6
7
8
9
10
11
12
13
14
15
16
17
18
19
20
21
22
23
24
25
final boolean startPausingLocked(boolean userLeaving, boolean uiSleeping,
ActivityRecord resuming, boolean dontWait) {
...
if (prev.app != null && prev.app.thread != null) {
if (DEBUG_PAUSE) Slog.v(TAG_PAUSE, "Enqueueing pending pause: " + prev);
try {
EventLog.writeEvent(EventLogTags.AM_PAUSE_ACTIVITY,
prev.userId, System.identityHashCode(prev),
prev.shortComponentName);
mService.updateUsageStats(prev, false);
prev.app.thread.schedulePauseActivity(prev.appToken, prev.finishing,
userLeaving, prev.configChangeFlags, dontWait);
} catch (Exception e) {
Slog.w(TAG, "Exception thrown during pause", e);
mPausingActivity = null;
mLastPausedActivity = null;
mLastNoHistoryActivity = null;
}
} else {
mPausingActivity = null;
mLastPausedActivity = null;
mLastNoHistoryActivity = null;
}
...
}

第 11 行 prev.app.thread.schedulePauseActivity(),这个 thread 其实是个 IApplicationThread 类型的对象,在 ActivityThread 中有看到内部类 ApplicationThread 以及它的父类 ApplicationThreadNative,而 ApplicationThreadNative 又继承了 Binder 并且实现了 IApplicationThread。不难看出,这里也是进行跨进程通信的,thread 是个客户端,而 ApplicationThread 则是服务端。

接下来继续看 AppicationThread 的 schedulePauseActivity():

1
2
3
4
5
6
7
8
9
10
11
12
13
14
15
16
17
18
19
20
21
22
23
24
25
26
27
public final void schedulePauseActivity(IBinder token, boolean finished,
boolean userLeaving, int configChanges, boolean dontReport) {
sendMessage(
finished ? H.PAUSE_ACTIVITY_FINISHING : H.PAUSE_ACTIVITY,
token,
(userLeaving ? 1 : 0) | (dontReport ? 2 : 0),
configChanges);
}

private void sendMessage(int what, Object obj, int arg1, int arg2) {
sendMessage(what, obj, arg1, arg2, false);
}

private void sendMessage(int what, Object obj, int arg1, int arg2, boolean async) {
if (DEBUG_MESSAGES) Slog.v(
TAG, "SCHEDULE " + what + " " + mH.codeToString(what)
+ ": " + arg1 + " / " + obj);
Message msg = Message.obtain();
msg.what = what;
msg.obj = obj;
msg.arg1 = arg1;
msg.arg2 = arg2;
if (async) {
msg.setAsynchronous(true);
}
mH.sendMessage(msg);
}

很明显,这里通过 H 发送了一个 PAUSE_ACTIVITY_FINISHING 的消息,看看是怎么处理的:

1
2
3
4
5
6
7
8
9
10
11
12
13
14
15
16
17
18
19
20
21
22
23
24
25
26
27
28
29
30
31
32
33
34
35
36
37
38
39
40
41
42
43
44
45
46
47
48
49
50
51
52
53
54
55
56
57
58
59
60
61
62
public void handleMessage(Message msg) {
if (DEBUG_MESSAGES) Slog.v(TAG, ">>> handling: " + codeToString(msg.what));
switch (msg.what) {
...
case PAUSE_ACTIVITY_FINISHING:
Trace.traceBegin(Trace.TRACE_TAG_ACTIVITY_MANAGER, "activityPause");
handlePauseActivity((IBinder)msg.obj, true, (msg.arg1&1) != 0, msg.arg2,
(msg.arg1&1) != 0);
Trace.traceEnd(Trace.TRACE_TAG_ACTIVITY_MANAGER);
break;
...
}
}

private void handlePauseActivity(IBinder token, boolean finished,
boolean userLeaving, int configChanges, boolean dontReport) {
ActivityClientRecord r = mActivities.get(token);
if (r != null) {
...
r.activity.mConfigChangeFlags |= configChanges;
performPauseActivity(token, finished, r.isPreHoneycomb());
...
if (!dontReport) {
try {
ActivityManagerNative.getDefault().activityPaused(token);
} catch (RemoteException ex) {
}
}
mSomeActivitiesChanged = true;
}
}

final Bundle performPauseActivity(IBinder token, boolean finished,
boolean saveState) {
ActivityClientRecord r = mActivities.get(token);
return r != null ? performPauseActivity(r, finished, saveState) : null;
}

final Bundle performPauseActivity(ActivityClientRecord r, boolean finished,
boolean saveState) {
...
try {
...
// Now we are idle.
r.activity.mCalled = false;
mInstrumentation.callActivityOnPause(r.activity);
EventLog.writeEvent(LOG_AM_ON_PAUSE_CALLED, UserHandle.myUserId(),
r.activity.getComponentName().getClassName());
if (!r.activity.mCalled) {
throw new SuperNotCalledException(
"Activity " + r.intent.getComponent().toShortString() +
" did not call through to super.onPause()");
}
} catch (SuperNotCalledException e) {
throw e;
} catch (Exception e) {
...
}
}
...
return !r.activity.mFinished && saveState ? r.state : null;
}

首先在第 7 行调用了 ActivityThread 的 handlePauseActivity() 方法,后面几个方法都是在 ActivityThread 里面的跳转,最后跳转到了 Instrumentation 的 callActivityOnPause():

1
2
3
public void callActivityOnPause(Activity activity) {
activity.performPause();
}

直接调用了 Activity 的 performPause():

1
2
3
4
5
6
7
8
9
10
11
12
13
14
final void performPause() {
mDoReportFullyDrawn = false;
mFragments.dispatchPause();
mCalled = false;
onPause();
mResumed = false;
if (!mCalled && getApplicationInfo().targetSdkVersion
>= android.os.Build.VERSION_CODES.GINGERBREAD) {
throw new SuperNotCalledException(
"Activity " + mComponent.toShortString() +
" did not call through to super.onPause()");
}
mResumed = false;
}

终于在第 5 行看到了第一个生命周期方法 onPause() 的回调,不容易啊。

回到 ActivityStack 的 resumeTopActivityInnerLocked() 方法,有一句 mStackSupervisor.startSpecificActivityLocked(next, true, false),所以看看 startSpecificActivityLocked() 方法:

1
2
3
4
5
6
7
8
9
10
11
12
13
14
15
16
17
18
19
void startSpecificActivityLocked(ActivityRecord r, boolean andResume, boolean checkConfig) {
...
if (app != null && app.thread != null) {
try {
if ((r.info.flags&ActivityInfo.FLAG_MULTIPROCESS) == 0
|| !"android".equals(r.info.packageName)) {
app.addPackage(r.info.packageName, r.info.applicationInfo.versionCode,
mService.mProcessStats);
}
realStartActivityLocked(r, app, andResume, checkConfig);
return;
} catch (RemoteException e) {
Slog.w(TAG, "Exception when starting activity "
+ r.intent.getComponent().flattenToShortString(), e);
}
}
mService.startProcessLocked(r.processName, r.info.applicationInfo, true, 0,
"activity", r.intent.getComponent(), false, false, true);
}

首先会判断目标 Activity 所需的应用进程是否已经启动,如果已经启动了就直接调用 realStartActivityLocked() 方法,否则就调用 startProcessLocked() 方法来启动应用进程。

2.3 小结

对比 ApplicationThread 和 ActivityManagerNative:

通过 ActivityManagerNative -> ActivityManagerService 实现了应用进程与 SystemServer 进程的通讯

通过 app.thread -> AppicationThread 实现了 SystemServer 进程与应用进程的通讯

3 启动 Activity 所需的进程

3.1 启动 Activity 所需的进程

接下来看看启动应用进程的过程,首先是 AMS 的 startProcessLocked():

1
2
3
4
5
6
7
8
9
10
11
12
13
14
15
16
17
18
19
20
21
22
23
24
25
26
27
28
29
30
31
32
33
34
35
36
37
38
39
    final ProcessRecord startProcessLocked(String processName,
ApplicationInfo info, boolean knownToBeDead, int intentFlags,
String hostingType, ComponentName hostingName, boolean allowWhileBooting,
boolean isolated, boolean keepIfLarge) {
return startProcessLocked(processName, info, knownToBeDead, intentFlags, hostingType,
hostingName, allowWhileBooting, isolated, 0 /* isolatedUid */, keepIfLarge,
null /* ABI override */, null /* entryPoint */, null /* entryPointArgs */,
null /* crashHandler */);
}

final ProcessRecord startProcessLocked(String processName, ApplicationInfo info,
boolean knownToBeDead, int intentFlags, String hostingType, ComponentName hostingName,
boolean allowWhileBooting, boolean isolated, int isolatedUid, boolean keepIfLarge,
String abiOverride, String entryPoint, String[] entryPointArgs, Runnable crashHandler) {
...
startProcessLocked(
app, hostingType, hostingNameStr, abiOverride, entryPoint, entryPointArgs);
checkTime(startTime, "startProcess: done starting proc!");
return (app.pid != 0) ? app : null;
}

private final void startProcessLocked(ProcessRecord app, String hostingType,
String hostingNameStr, String abiOverride, String entryPoint, String[] entryPointArgs) {
long startTime = SystemClock.elapsedRealtime();
...
// Start the process. It will either succeed and return a result containing
// the PID of the new process, or else throw a RuntimeException.
boolean isActivityProcess = (entryPoint == null);
if (entryPoint == null) entryPoint = "android.app.ActivityThread";
Trace.traceBegin(Trace.TRACE_TAG_ACTIVITY_MANAGER, "Start proc: " +
app.processName);
checkTime(startTime, "startProcess: asking zygote to start proc");
Process.ProcessStartResult startResult = Process.start(entryPoint,
app.processName, uid, uid, gids, debugFlags, mountExternal,
app.info.targetSdkVersion, app.info.seinfo, requiredAbi, instructionSet,
app.info.dataDir, entryPointArgs);
...
}
}

经过几个重载的 startProcessLocked() 方法后进入了 Process 的 start():

1
2
3
4
5
6
7
8
9
10
11
12
13
14
15
16
17
18
19
20
21
22
23
24
25
26
27
28
29
30
31
32
33
34
35
36
37
38
39
40
41
42
43
44
45
46
47
48
49
50
51
52
53
54
55
56
57
58
59
60
61
62
63
64
65
66
67
68
69
70
71
72
73
74
75
76
77
78
79
80
81
82
83
84
public static final ProcessStartResult start(final String processClass,
final String niceName,
int uid, int gid, int[] gids,
int debugFlags, int mountExternal,
int targetSdkVersion,
String seInfo,
String abi,
String instructionSet,
String appDataDir,
String[] zygoteArgs) {
try {
return startViaZygote(processClass, niceName, uid, gid, gids,
debugFlags, mountExternal, targetSdkVersion, seInfo,
abi, instructionSet, appDataDir, zygoteArgs);
} catch (ZygoteStartFailedEx ex) {
Log.e(LOG_TAG,
"Starting VM process through Zygote failed");
throw new RuntimeException(
"Starting VM process through Zygote failed", ex);
}
}

private static ProcessStartResult startViaZygote(final String processClass,
final String niceName,
final int uid, final int gid,
final int[] gids,
int debugFlags, int mountExternal,
int targetSdkVersion,
String seInfo,
String abi,
String instructionSet,
String appDataDir,
String[] extraArgs)
throws ZygoteStartFailedEx {
synchronized(Process.class) {
...
return zygoteSendArgsAndGetResult(openZygoteSocketIfNeeded(abi), argsForZygote);
}
}

private static ProcessStartResult zygoteSendArgsAndGetResult(
ZygoteState zygoteState, ArrayList<String> args)
throws ZygoteStartFailedEx {
try {
// Throw early if any of the arguments are malformed. This means we can
// avoid writing a partial response to the zygote.
int sz = args.size();
for (int i = 0; i < sz; i++) {
if (args.get(i).indexOf('\n') >= 0) {
throw new ZygoteStartFailedEx("embedded newlines not allowed");
}
}
final BufferedWriter writer = zygoteState.writer;
final DataInputStream inputStream = zygoteState.inputStream;

writer.write(Integer.toString(args.size()));
writer.newLine();

for (int i = 0; i < sz; i++) {
String arg = args.get(i);
writer.write(arg);
writer.newLine();
}

writer.flush();

// Should there be a timeout on this?
ProcessStartResult result = new ProcessStartResult();

// Always read the entire result from the input stream to avoid leaving
// bytes in the stream for future process starts to accidentally stumble
// upon.
result.pid = inputStream.readInt();
result.usingWrapper = inputStream.readBoolean();

if (result.pid < 0) {
throw new ZygoteStartFailedEx("fork() failed");
}
return result;
} catch (IOException ex) {
zygoteState.close();
throw new ZygoteStartFailedEx(ex);
}
}

在 zygoteSendArgsAndGetResult() 方法中通过 socket 的方式让 Zygote 进程 fork 了一个新的进程,并且根据“android.app.ActivityThread”字符串反射出该对象并执行 ActivityThread 的 main() 方法。

接下来看看 ActivityThread 的 main() 方法:

1
2
3
4
5
6
7
8
9
10
11
12
13
14
15
16
17
18
19
20
21
22
23
24
25
26
27
28
29
30
31
32
33
34
35
36
37
38
39
40
41
42
43
44
45
46
47
48
49
50
51
52
53
54
55
56
57
58
public static void main(String[] args) {
Trace.traceBegin(Trace.TRACE_TAG_ACTIVITY_MANAGER, "ActivityThreadMain");
SamplingProfilerIntegration.start();

CloseGuard.setEnabled(false);

Environment.initForCurrentUser();

// Set the reporter for event logging in libcore
EventLogger.setReporter(new EventLoggingReporter());

AndroidKeyStoreProvider.install();

// Make sure TrustedCertificateStore looks in the right place for CA certificates
final File configDir = Environment.getUserConfigDirectory(UserHandle.myUserId());
TrustedCertificateStore.setDefaultUserDirectory(configDir);

Process.setArgV0("<pre-initialized>");

Looper.prepareMainLooper();

ActivityThread thread = new ActivityThread();
thread.attach(false);

if (sMainThreadHandler == null) {
sMainThreadHandler = thread.getHandler();
}

if (false) {
Looper.myLooper().setMessageLogging(new
LogPrinter(Log.DEBUG, "ActivityThread"));
}
Trace.traceEnd(Trace.TRACE_TAG_ACTIVITY_MANAGER);
Looper.loop();

throw new RuntimeException("Main thread loop unexpectedly exited");
}

private void attach(boolean system) {
sCurrentActivityThread = this;
mSystemThread = system;
if (!system) {
...
android.ddm.DdmHandleAppName.setAppName("<pre-initialized>",
UserHandle.myUserId());
RuntimeInit.setApplicationObject(mAppThread.asBinder());
final IActivityManager mgr = ActivityManagerNative.getDefault();
try {
mgr.attachApplication(mAppThread);
} catch (RemoteException ex) {
// Ignore
}
...
} else {
...
}
...
}

main() 方法主要做了一些初始化的事情,然后调用了 attach() 方法。前面已经分析过了,ActivityManagerNative 是 AMS 的客户端,所以第 49 行的 mgr.attachApplication(mAppThread) 就是通过 Binder 调用了 AMS 的 attachApplication() 方法:

1
2
3
4
5
6
7
8
9
10
11
12
13
14
15
16
17
18
19
20
21
22
23
24
25
26
  @Override
public final void attachApplication(IApplicationThread thread) {
synchronized (this) {
int callingPid = Binder.getCallingPid();
final long origId = Binder.clearCallingIdentity();
attachApplicationLocked(thread, callingPid);
Binder.restoreCallingIdentity(origId);
}
}

private final boolean attachApplicationLocked(IApplicationThread thread,
int pid) {
...
if (normalMode) {
try {
if (mStackSupervisor.attachApplicationLocked(app)) {
didSomething = true;
}
} catch (Exception e) {
Slog.wtf(TAG, "Exception thrown launching activities in " + app, e);
badApp = true;
}
}
...
return true;
}

可以看到,在 attachApplication() 方法中调用了 attachApplicationLocked(),在 attachApplicationLocked() 方法中又调用了 ActivityStackSupervisor 的 attachApplicationLocked() 方法(上面第16行处)。

attachApplicationLocked 这个方法比较长(这里省略了大部分),其实它执行了一系列的初始化操作,这样整个应用进程就启动了。

3.2 小结

4 onCreate() 的回调

4.1 接收 SystemService 消息

接着看 ActivityStackSupervisor 的 attachApplicationLocked() 方法:

1
2
3
4
5
6
7
8
9
10
11
12
13
14
15
16
17
18
19
20
21
22
23
24
25
26
27
28
29
30
31
32
33
34
35
36
37
38
39
40
41
42
43
44
45
  boolean attachApplicationLocked(ProcessRecord app) throws RemoteException {
final String processName = app.processName;
boolean didSomething = false;
for (int displayNdx = mActivityDisplays.size() - 1; displayNdx >= 0; --displayNdx) {
ArrayList<ActivityStack> stacks = mActivityDisplays.valueAt(displayNdx).mStacks;
for (int stackNdx = stacks.size() - 1; stackNdx >= 0; --stackNdx) {
final ActivityStack stack = stacks.get(stackNdx);
if (!isFocusedStack(stack)) {
continue;
}
ActivityRecord hr = stack.topRunningActivityLocked();
if (hr != null) {
if (hr.app == null && app.uid == hr.info.applicationInfo.uid
&& processName.equals(hr.processName)) {
try {
if (realStartActivityLocked(hr, app, true, true)) {
didSomething = true;
}
} catch (RemoteException e) {
Slog.w(TAG, "Exception in new application when starting activity "
+ hr.intent.getComponent().flattenToShortString(), e);
throw e;
}
}
}
}
}
if (!didSomething) {
ensureActivitiesVisibleLocked(null, 0, !PRESERVE_WINDOWS);
}
return didSomething;
}

final boolean realStartActivityLocked(ActivityRecord r, ProcessRecord app,
boolean andResume, boolean checkConfig) throws RemoteException {
...
app.forceProcessStateUpTo(mService.mTopProcessState);
app.thread.scheduleLaunchActivity(new Intent(r.intent), r.appToken,
System.identityHashCode(r), r.info, new Configuration(mService.mConfiguration),
new Configuration(task.mOverrideConfig), r.compat, r.launchedFromPackage,
task.voiceInteractor, app.repProcState, r.icicle, r.persistentState, results,
newIntents, !andResume, mService.isNextTransitionForward(), profilerInfo);
...
return true;
}

在 attachApplicationLocked() 方法中调用了 realStartActivityLocked() 方法,通过方法名字就知道是用来启动 Activity 的。

realStartActivityLocked() 中和栈顶 Activity 的 onPause() 过程相似,也是通过调用 app.thread 即 IApplicationThread 的方法 scheduleLaunchActivity() 来实现的。所以类似的,最后也会去到 ApplicationThread 的 scheduleLaunchActivity() 方法。

4.2 ActivityThread 处理消息

所以下面看看 ApplicationThread 的 scheduleLaunchActivity() 方法:

1
2
3
4
5
6
7
8
9
10
11
12
13
14
15
16
17
18
19
20
21
22
23
24
25
26
27
28
29
30
31
32
33
34
35
36
37
38
39
40
41
42
43
44
45
46
47
48
49
50
51
52
53
54
55
56
57
58
59
60
61
@Override
public final void scheduleLaunchActivity(Intent intent, IBinder token, int ident,
ActivityInfo info, Configuration curConfig, Configuration overrideConfig,
CompatibilityInfo compatInfo, String referrer, IVoiceInteractor voiceInteractor,
int procState, Bundle state, PersistableBundle persistentState,
List<ResultInfo> pendingResults, List<ReferrerIntent> pendingNewIntents,
boolean notResumed, boolean isForward, ProfilerInfo profilerInfo) {
updateProcessState(procState, false);
ActivityClientRecord r = new ActivityClientRecord();
r.token = token;
r.ident = ident;
r.intent = intent;
r.referrer = referrer;
r.voiceInteractor = voiceInteractor;
r.activityInfo = info;
r.compatInfo = compatInfo;
r.state = state;
r.persistentState = persistentState;
r.pendingResults = pendingResults;
r.pendingIntents = pendingNewIntents;
r.startsNotResumed = notResumed;
r.isForward = isForward;
r.profilerInfo = profilerInfo;
r.overrideConfig = overrideConfig;
updatePendingConfiguration(curConfig);
sendMessage(H.LAUNCH_ACTIVITY, r);
}

private void sendMessage(int what, Object obj) {
sendMessage(what, obj, 0, 0, false);
}

private void sendMessage(int what, Object obj, int arg1, int arg2, boolean async) {
if (DEBUG_MESSAGES) Slog.v(
TAG, "SCHEDULE " + what + " " + mH.codeToString(what)
+ ": " + arg1 + " / " + obj);
Message msg = Message.obtain();
msg.what = what;
msg.obj = obj;
msg.arg1 = arg1;
msg.arg2 = arg2;
if (async) {
msg.setAsynchronous(true);
}
mH.sendMessage(msg);
}

public void handleMessage(Message msg) {
switch (msg.what) {
case LAUNCH_ACTIVITY: {
Trace.traceBegin(Trace.TRACE_TAG_ACTIVITY_MANAGER, "activityStart");
final ActivityClientRecord r = (ActivityClientRecord) msg.obj;

r.packageInfo = getPackageInfoNoCheck(
r.activityInfo.applicationInfo, r.compatInfo);
handleLaunchActivity(r, null);
Trace.traceEnd(Trace.TRACE_TAG_ACTIVITY_MANAGER);
} break;
...
}
}

还是一样的逻辑,scheduleLaunchActivity() 会通过 ActivityThread 的内部类 H 来分发消息,然后再调用 ActivityThread 的 handleLaunchActivity() 方法:

1
2
3
4
5
6
7
8
9
10
11
12
13
14
15
16
17
18
19
20
21
22
23
24
25
26
27
28
29
30
31
32
33
34
35
36
37
38
39
40
41
42
43
44
45
46
47
48
49
 private void handleLaunchActivity(ActivityClientRecord r, Intent customIntent) {
...
WindowManagerGlobal.initialize();
Activity a = performLaunchActivity(r, customIntent);
if (a != null) {
r.createdConfig = new Configuration(mConfiguration);
Bundle oldState = r.state;
handleResumeActivity(r.token, false, r.isForward,
!r.activity.mFinished && !r.startsNotResumed);
...
} else {
...
}
}

private Activity performLaunchActivity(ActivityClientRecord r, Intent customIntent) {
...
try {
Application app = r.packageInfo.makeApplication(false, mInstrumentation);
...
if (activity != null) {
...
if (r.isPersistable()) {
mInstrumentation.callActivityOnCreate(activity, r.state, r.persistentState);
} else {
mInstrumentation.callActivityOnCreate(activity, r.state);
}
if (!activity.mCalled) {
throw new SuperNotCalledException(
"Activity " + r.intent.getComponent().toShortString() +
" did not call through to super.onCreate()");
}
r.activity = activity;
r.stopped = true;
if (!r.activity.mFinished) {
activity.performStart();
r.stopped = false;
}
...
}
r.paused = true;
mActivities.put(r.token, r);
} catch (SuperNotCalledException e) {
throw e;
} catch (Exception e) {
...
}
return activity;
}

handleLaunchActivity() 方法调用了 performLaunchActivity() 方法,而 performLaunchActivity() 方法又调用了 Instrumentation 的 callActivityOnCreate() 方法:

1
2
3
4
5
6
public void callActivityOnCreate(Activity activity, Bundle icicle,
PersistableBundle persistentState) {
prePerformCreate(activity);
activity.performCreate(icicle, persistentState);
postPerformCreate(activity);
}

在 callActivityOnCreate() 方法里面又调用了 Activity 的 performCreate() 方法:

1
2
3
4
5
final void performCreate(Bundle icicle) {
onCreate(icicle);
mActivityTransitionState.readState(icicle);
performCreateCommon();
}

哈哈,终于见到了 onCreate() 方法。

4.3 小节

这个过程其实主要就是 AMS 通过 Binder 向 ActivityThread 发送启动 Activity 的消息。

5 onStart() 的回调

回到 ActivityThread 的 performLaunchActivity() 方法中,在调用 mInstrumentation.callActivityOnCreate() 之后还调用了 activity.performStart(),即到了 Activity 的 performStart() 方法:

1
2
3
4
5
6
7
8
9
10
11
12
13
14
15
final void performStart() {
mActivityTransitionState.setEnterActivityOptions(this, getActivityOptions());
mFragments.noteStateNotSaved();
mCalled = false;
mFragments.execPendingActions();
mInstrumentation.callActivityOnStart(this);
if (!mCalled) {
throw new SuperNotCalledException(
"Activity " + mComponent.toShortString() +
" did not call through to super.onStart()");
}
mFragments.dispatchStart();
mFragments.reportLoaderStart();
mActivityTransitionState.enterReady(this);
}

performStart() 方法中又调用了 Instrumentation.callActivityOnStart(),所以再看 callActivityOnStart() 方法:

1
2
3
public void callActivityOnStart(Activity activity) {
activity.onStart();
}

直接调用了 Activity 的 onStart() 方法,这是第三个生命周期方法的回调了,绕了一圈,好晕。

6 onResume() 的回调

回到 ActivityThread 的 handleLaunchActivity() 方法,在调用 performLaunchActivity() 方法之后还调用了 handleResumeActivity() 方法,看名字像是回调 onResume() 方法的,那么看看 handleResumeActivity() 方法:

1
2
3
4
5
6
7
8
9
10
11
12
13
14
15
16
17
18
19
20
  final void handleResumeActivity(IBinder token,
boolean clearHide, boolean isForward, boolean reallyResume) {
unscheduleGcIdler();
mSomeActivitiesChanged = true;
ActivityClientRecord r = performResumeActivity(token, clearHide);
...
if (r != null) {
...
if (!r.onlyLocalRequest) {
r.nextIdle = mNewActivities;
mNewActivities = r;
if (localLOGV) Slog.v(
TAG, "Scheduling idle handler for " + r);
Looper.myQueue().addIdleHandler(new Idler());
}
...
} else {
...
}
}

在第 5 行代码处调用了 performResumeActivity(),来看一下 performResumeActivity() 方法:

1
2
3
4
5
6
7
8
9
10
11
12
13
14
15
public final ActivityClientRecord performResumeActivity(IBinder token,
boolean clearHide) {
ActivityClientRecord r = mActivities.get(token);
if (r != null && !r.activity.mFinished) {
...
try {
...
r.activity.performResume();
...
} catch (Exception e) {
...
}
}
return r;
}

在上述的第 8 行代码处又调用了 Activity 的 performResume() 方法,根据前面分析过程,看到这就知道有戏。所以再来看 Activity 的 performResume() 方法:

1
2
3
4
5
6
7
8
9
final void performResume() {
performRestart();
mFragments.execPendingActions();
mLastNonConfigurationInstances = null;
mCalled = false;
// mResumed is set by the instrumentation
mInstrumentation.callActivityOnResume(this);
...
}

又跑到了 Instrumentation 去了,看看 callActivityOnResume() 方法:

1
2
3
4
5
6
7
8
9
10
11
12
13
14
public void callActivityOnResume(Activity activity) {
activity.mResumed = true;
activity.onResume();

if (mActivityMonitors != null) {
synchronized (mSync) {
final int N = mActivityMonitors.size();
for (int i=0; i<N; i++) {
final ActivityMonitor am = mActivityMonitors.get(i);
am.match(activity, activity, activity.getIntent());
}
}
}
}

第 3 行处调用了 Activity 的 onResume() 方法,这是第四个生命周期方法的回调了。但是这回就没什么兴奋的了,毕竟都已经猜到了。

7 onStop() 的回调

回到 handleResumeActivity() 方法,在调用 performResumeActivity() 方法之后还调用了 Looper.myQueue().addIdleHandler(new Idler()),这句代码是异步消息机制相关的代码,来看看 Idler 的实现:

1
2
3
4
5
6
7
8
9
10
11
12
13
14
15
16
17
18
19
20
21
22
23
24
25
26
27
28
29
30
31
32
33
34
35
36
37
38
private class Idler implements MessageQueue.IdleHandler {
@Override
public final boolean queueIdle() {
ActivityClientRecord a = mNewActivities;
boolean stopProfiling = false;
if (mBoundApplication != null && mProfiler.profileFd != null
&& mProfiler.autoStopProfiler) {
stopProfiling = true;
}
if (a != null) {
mNewActivities = null;
IActivityManager am = ActivityManagerNative.getDefault();
ActivityClientRecord prev;
do {
if (localLOGV) Slog.v(
TAG, "Reporting idle of " + a +
" finished=" +
(a.activity != null && a.activity.mFinished));
if (a.activity != null && !a.activity.mFinished) {
try {
am.activityIdle(a.token, a.createdConfig, stopProfiling);
a.createdConfig = null;
} catch (RemoteException ex) {
// Ignore
}
}
prev = a;
a = a.nextIdle;
prev.nextIdle = null;
} while (a != null);
}
if (stopProfiling) {
mProfiler.stopProfiling();
}
ensureJitEnabled();
return false;
}
}

在上述第 21 行调用了 activityIdle() 方法,经过前面的分析知道这里又是 Binder 通信,ActivityManagerNative.getDefault() 就是 AMS,所以最后就到了 ActivityManagerService 的 activityIdle() 方法:

1
2
3
4
5
6
7
8
9
10
11
12
13
14
15
16
17
18
19
20
21
@Override
public final void activityIdle(IBinder token, Configuration config, boolean stopProfiling) {
final long origId = Binder.clearCallingIdentity();
synchronized (this) {
ActivityStack stack = ActivityRecord.getStackLocked(token);
if (stack != null) {
ActivityRecord r =
mStackSupervisor.activityIdleInternalLocked(token, false, config);
if (stopProfiling) {
if ((mProfileProc == r.app) && (mProfileFd != null)) {
try {
mProfileFd.close();
} catch (IOException e) {
}
clearProfilerLocked();
}
}
}
}
Binder.restoreCallingIdentity(origId);
}

在上述第 8 行代码调用了ActivityStackSupervisor 的 activityIdleInternalLocked() 方法:

1
2
3
4
5
6
7
8
9
10
11
12
13
14
15
16
17
  final ActivityRecord activityIdleInternalLocked(final IBinder token, boolean fromTimeout,
Configuration config) {
...
for (int i = 0; i < NS; i++) {
r = stops.get(i);
final ActivityStack stack = r.task.stack;
if (stack != null) {
if (r.finishing) {
stack.finishCurrentActivityLocked(r, ActivityStack.FINISH_IMMEDIATELY, false);
} else {
stack.stopActivityLocked(r);
}
}
}
...
return r;
}

然后在上述第 11 行处调用了ActivityStack 的 stopActivityLocked() 方法:

1
2
3
4
5
6
7
8
9
10
11
12
13
14
15
16
17
18
19
20
  final void stopActivityLocked(ActivityRecord r) {
...
if (r.app != null && r.app.thread != null) {
adjustFocusedActivityLocked(r, "stopActivity");
r.resumeKeyDispatchingLocked();
try {
...
EventLogTags.writeAmStopActivity(
r.userId, System.identityHashCode(r), r.shortComponentName);
r.app.thread.scheduleStopActivity(r.appToken, r.visible, r.configChangeFlags);
if (mService.isSleepingOrShuttingDownLocked()) {
r.setSleeping(true);
}
Message msg = mHandler.obtainMessage(STOP_TIMEOUT_MSG, r);
mHandler.sendMessageDelayed(msg, STOP_TIMEOUT);
} catch (Exception e) {
...
}
}
}

上述代码第 10 行 r.app.thread.scheduleStopActivity(),好吧,都是同一个套路。通过 IApplicationThread 的 scheduleStopActivity() 方法最终调用了 ActivityThread 的 scheduleStopActivity() 方法:

1
2
3
4
5
6
7
8
9
10
11
12
13
14
15
16
17
18
19
20
21
22
23
24
25
26
27
28
29
30
31
32
33
34
35
36
37
38
39
40
41
42
43
public final void scheduleStopActivity(IBinder token, boolean showWindow,
int configChanges) {
sendMessage(
showWindow ? H.STOP_ACTIVITY_SHOW : H.STOP_ACTIVITY_HIDE,
token, 0, configChanges);
}

private void sendMessage(int what, Object obj, int arg1, int arg2) {
sendMessage(what, obj, arg1, arg2, false);
}

private void sendMessage(int what, Object obj, int arg1, int arg2, boolean async) {
if (DEBUG_MESSAGES) Slog.v(
TAG, "SCHEDULE " + what + " " + mH.codeToString(what)
+ ": " + arg1 + " / " + obj);
Message msg = Message.obtain();
msg.what = what;
msg.obj = obj;
msg.arg1 = arg1;
msg.arg2 = arg2;
if (async) {
msg.setAsynchronous(true);
}
mH.sendMessage(msg);
}

public void handleMessage(Message msg) {
if (DEBUG_MESSAGES) Slog.v(TAG, ">>> handling: " + codeToString(msg.what));
switch (msg.what) {
...
case STOP_ACTIVITY_SHOW:
Trace.traceBegin(Trace.TRACE_TAG_ACTIVITY_MANAGER, "activityStop");
handleStopActivity((IBinder)msg.obj, true, msg.arg2);
Trace.traceEnd(Trace.TRACE_TAG_ACTIVITY_MANAGER);
break;
case STOP_ACTIVITY_HIDE:
Trace.traceBegin(Trace.TRACE_TAG_ACTIVITY_MANAGER, "activityStop");
handleStopActivity((IBinder)msg.obj, false, msg.arg2);
Trace.traceEnd(Trace.TRACE_TAG_ACTIVITY_MANAGER);
break;
...
}
}

还是一样的配方,还是熟悉的味道。scheduleStopActivity() 方法最终都会调用 ActivityThread 的 sendMessage() 方法,然后在 H 的 handleMessage() 方法中处理。在 handleMessage() 方法中调用了 handleStopActivity() 方法:

1
2
3
4
5
6
7
8
9
10
11
12
13
14
15
16
17
18
19
20
21
22
23
24
25
26
27
28
  private void handleStopActivity(IBinder token, boolean show, int configChanges) {
...
performStopActivityInner(r, info, show, true);
...
}

private void performStopActivityInner(ActivityClientRecord r,
StopInfo info, boolean keepShown, boolean saveState) {
if (localLOGV) Slog.v(TAG, "Performing stop of " + r);
if (r != null) {
...
if (!keepShown) {
try {
// Now we are idle.
r.activity.performStop();
} catch (Exception e) {
if (!mInstrumentation.onException(r.activity, e)) {
throw new RuntimeException(
"Unable to stop activity "
+ r.intent.getComponent().toShortString()
+ ": " + e.toString(), e);
}
}
r.stopped = true;
}
r.paused = true;
}
}

handleStopActivity() 方法调用了 performStopActivityInner() 方法,performStopActivityInner() 方法又调用了 Activity 的 performStop() 方法:

1
2
3
4
5
6
7
8
9
10
11
12
final void performStop() {
mDoReportFullyDrawn = false;
mFragments.doLoaderStop(mChangingConfigurations /*retain*/);
if (!mStopped) {
...
mFragments.dispatchStop();
mCalled = false;
mInstrumentation.callActivityOnStop(this);
...
}
mResumed = false;
}

上述代码第 8 行调用了 Instrumentation 的 callActivityOnStop() 方法:

1
2
3
public void callActivityOnStop(Activity activity) {
activity.onStop();
}

简单又简洁,直接调用了 Activity 的 onStop() 方法。至此,五个回调方法都搞定了。

附送两张图,这是本人在分析这个过程记录的流程图:

参考

Android源码解析之(十四)–>Activity启动流程

坚持原创技术分享,您的支持将鼓励我继续创作!